
Last Updated: 06 Jan 2026
I still remember the day I started using MailerLite.
Everyone said the same thing:
“MailerLite is beginner-friendly.”
“It’s simple and easy to use.”
Honestly, I didn’t fully believe it.
After getting lost in complicated email tools before, I expected the same confusion again.
But when I opened MailerLite for the first time, it felt different.
The dashboard was clean.
The options actually made sense.
Still, when I looked for MailerLite tutorials, most of them were either outdated or skipped important steps.
That’s why I created this guide.
This is the MailerLite tutorial I wish I had on day one — simple, clear, and made for absolute beginners.
By the end of this tutorial, you’ll know exactly how to set up MailerLite and send your first email with confidence.
Let’s get started 🚀
MailerLite Tutorial – Understanding the MailerLite Dashboard
When you log into MailerLite for the first time, it feels clean —
but if you’re new to email marketing, it can still feel unfamiliar.
So instead of overwhelming you, let me give you a simple tour of the dashboard, focusing only on what actually matters as a beginner.
Think of this as me sitting next to you, showing you where to click and what to ignore for now.
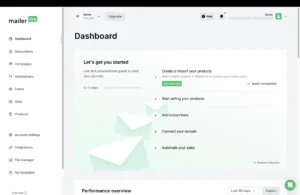
The Main Navigation Menu (What You’ll Actually Use)
This is the first screen you’ll see.
It shows:
Your latest email performance
Subscriber growth
Basic activity stats
👉 As a beginner, you don’t need to analyze anything here yet.
Just know this is where you’ll later check how your emails performed.
Create (Your Starting Point)
Whenever you want to create something new, you’ll click Create.
From here, you can start:
An email campaign
A signup form
An automation
👉 As a beginner, you’ll mostly use:
Campaigns and Forms
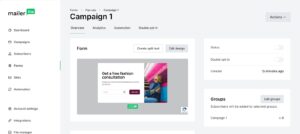
Campaigns (Where You Create & Send Emails)
This is where all your emails live.
Inside Campaigns, you can:
Create newsletters
Edit drafts
View sent emails
Think of this as your email workspace.
You’ll come here often.
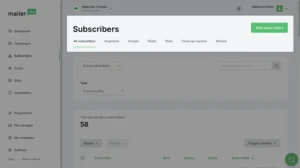
Subscribers (Your Email List)
This section is all about the people on your list.
Here you can:
View all subscribers
Organize them using Groups and Segments
👉 This is where you’ll manage your email list — nothing complicated.
Forms (How People Join Your List)
This is where you create:
Embedded forms
Pop-ups
Any time someone subscribes to your emails, it starts here.
Automation (Optional for Now)
Automation lets you send emails automatically, like a welcome email.
👉 As a beginner, you only need one simple automation — or you can skip this for now and come back later.
The Only Thing You Need to Remember
You don’t need to use everything in MailerLite.
Right now, your focus is simple:
👉 Create a form → Collect emails → Send your first email
That’s it.
Step 1: Create Your MailerLite Account
Before you can send emails, you need a MailerLite account.
The setup is simple, but there are a few things beginners often get wrong — so follow these steps carefully.
1. Sign Up for MailerLite
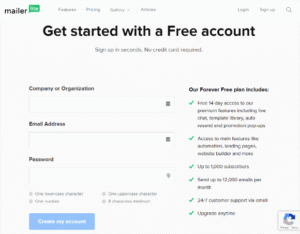
Go to the MailerLite website and click Sign Up Free.
Enter:
Your name
Email address
Password
After signing up, MailerLite will send you a verification email.
Confirm it to move forward.
2. Add Your Business Details
Once inside, MailerLite will ask for some basic information:
Company or website name
Website URL (if you don’t have one, you can still continue)
Industry and business type
Your physical address (required for email compliance)
👉 Tip: Even if you’re a blogger or creator, fill this honestly. This info appears in your email footer.
3. Verify Your Website & Email
MailerLite reviews new accounts to keep spam out of the platform.
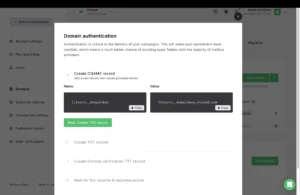
You may be asked to:
Verify your domain
Confirm how you plan to collect subscribers
This usually doesn’t take long, but it’s an important step.
👉 Until approval, you can build campaigns and forms, but you won’t be able to send emails yet.
4. Access Your Dashboard
Once approved, you’ll land inside the MailerLite dashboard we just explored.
At this point:
Your account is ready
You can start adding subscribers
You can create your first email
Step 2: Add Subscribers to MailerLite (Even If You’re Starting From Zero)
Before you can send emails, you need subscribers — real people who have given permission to hear from you.
MailerLite makes this simple, even if you’re just starting out.
There are two beginner-friendly ways to add subscribers.
Method 1: Add Subscribers Manually (Best for Small Lists)
If you already have a few email addresses (friends, clients, or test emails), this is the fastest way.
Steps:
Go to Subscribers
Click Add subscribers
Choose Add manually
Enter the email address and name
Assign them to a Group
Click Save
👉 Use this only for people who gave you permission to email them.
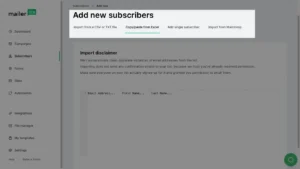
Method 2: Import Subscribers Using a CSV File
If you’re moving from another tool or already have a list:
Steps:
Go to Subscribers
Click Add subscribers
Choose Import from CSV
Upload your file
Match the fields (email, name, etc.)
Assign them to a Group
Complete the import
MailerLite may ask where you collected these emails — answer honestly.
Groups vs Segments
This confuses many beginners, so here’s the simple version:
Groups → Manual labels you assign (example: “Newsletter”, “Leads”)
Segments → Automatic lists based on rules (example: “Opened last email”)
👉 As a beginner, just use Groups.
You can learn Segments later.
Step 3: Create Your First Signup Form in MailerLite
If you don’t have subscribers yet, this is where everything begins.
A signup form allows people to enter their email address and join your list automatically — no manual work needed.
MailerLite makes this very beginner-friendly.
1. Go to the Forms Section
From your dashboard:
Click Forms
Click Create form
You’ll see a few options, but don’t worry — we’ll keep it simple.
2. Choose a Form Type
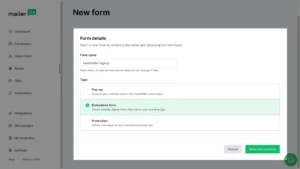
MailerLite offers different types of forms, but as a beginner, focus on these two:
Embedded form – placed inside a blog post or page
Pop-up form – appears on your site after a delay or action
👉 If you have a blog or website, start with an Embedded form.
3. Design Your Form
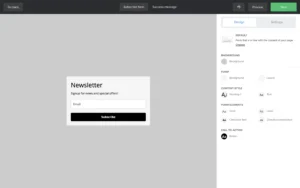
MailerLite opens a drag-and-drop editor.
Here’s all you really need:
An email field
A short headline (example: “Get free tips in your inbox”)
A subscribe button
Avoid adding too many fields.
The simpler the form, the higher the signup rate.
4. Connect the Form to a Group
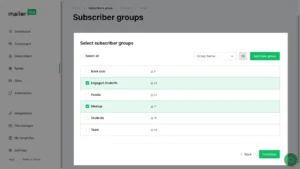
Before saving, MailerLite will ask you to assign the form to a Group.
This is important.
Anyone who signs up using this form will automatically be added to that group.
👉 Example group name: Newsletter Subscribers
5. Set the Success Message
After someone signs up, they should see a success message like:
“Thanks for subscribing! Check your inbox.”
You can customize this text, but keep it short and friendly.
6. Publish Your Form
Once you’re done:
Click Save
Copy the embed code (for embedded forms)
Paste it into your website where you want the form to appear
That’s it — your signup form is live 🎉
Step 4: Create and Send Your First Email Campaign in MailerLite
This is the moment everything comes together — sending your first email.
Don’t worry. MailerLite keeps this process simple and beginner-friendly.
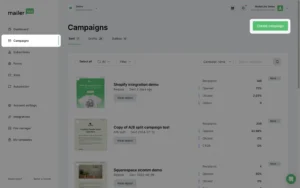
1. Start a New Campaign
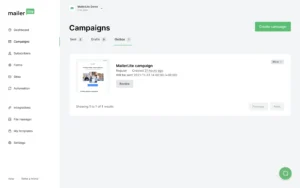
From your dashboard:
Click Campaigns
Click Create campaign
Choose Regular campaign
This is the option you’ll use for normal newsletters and announcements.
2. Name Your Campaign & Write the Subject Line
You’ll be asked to:
Give your campaign a name (for internal use)
Write your email subject line
👉 Tip: Keep your subject line short and clear.
Example: “Welcome! Here’s what you’ll get from me”
You can also add a preheader text, which shows next to the subject in inboxes.
3. Choose the Email Editor
MailerLite will ask how you want to design your email.
Choose:
Drag & Drop editor (best for beginners)
This opens the visual email builder.
4. Design Your Email
Inside the editor, you can:
Add text blocks
Insert images
Add buttons or links
For your first email, keep it simple:
A short introduction
One clear message
One link or call-to-action (optional)
👉 Simple emails usually perform better than heavily designed ones.
5. Select Your Recipients
Next, choose who should receive this email.
Select the Group you connected to your signup form
Double-check that the right group is selected
6. Preview & Test Your Email
Before sending:
Preview the email on desktop and mobile
Send a test email to yourself
Click every link to make sure it works
Never skip this step.
7. Send or Schedule Your Email
Finally, you can:
Send now, or
Schedule it for later
Once you click send, your first MailerLite email is officially on its way 🎉
Step 5: Set Up a Simple Welcome Automation in MailerLite
A welcome email is the first email someone receives after joining your list.
It sets expectations and builds trust.
The good news? MailerLite makes this very easy.
1. Go to Automation
From your dashboard:
Click Automation
Click Create workflow
2. Choose the Trigger
MailerLite will ask when this automation should start.
Choose:
When subscriber joins a group
Then select the same Group you connected to your signup form.
👉 This means:
Whenever someone signs up, this automation will start automatically.
3. Create Your Welcome Email
Click Add email inside the workflow.
You’ll be asked to:
Name the email
Write a subject line
Choose the Drag & Drop editor
For your welcome email, keep it simple:
Thank them for subscribing
Tell them what kind of emails they’ll receive
Set expectations (how often you’ll email)
4. (Optional) Add a Delay
If you want, you can add a delay before sending the email.
Example:
Send immediately, or
Send after 1 hour / 1 day
👉 For beginners, sending it immediately works perfectly.
5. Activate the Automation
Once your workflow looks good:
Click Save
Turn the workflow ON
That’s it 🎉
Your welcome email is now fully automated.
What You’ve Achieved So Far
At this point, you have:
A signup form collecting emails
A campaign sending emails
A welcome automation running in the background
Your email marketing system is officially live.
