
Last Updated: 30 Aug 2026
I use Brevo myself, on my own real list, so this isn’t a Brevo tutorial written from a demo account or a quick look around. This is the exact path I followed, plus the small things I learned the hard way, that I wish someone had told me before my first send.
If you’re brand new to Brevo, or even email marketing in general, this guide will take you from signing up, to growing your list with forms and landing pages, to sending your first real campaign, setting up automation, and checking if it actually worked. I’ll keep the words simple and skip the fancy talk, so you can just follow along and do it.
Brevo Tutorial – Short Summary
Setting up Brevo takes about thirty minutes if you follow the steps in order. You’ll create your account, confirm your email, set up your sender details, bring in and organize your contacts, grow your list with forms and a landing page, build your first campaign, set up a simple automation, and check your numbers afterward. The whole thing needs no code and no tech skills.
The one thing I’ll say up front, because it matters more than any button you’ll click: clean your contact list before your first send, and start slow. Brevo is quick to flag new accounts that send to a big, old, or unconfirmed list right away. Follow the steps below in order, and you’ll avoid that problem completely.
Step 1: Create Your Brevo Account
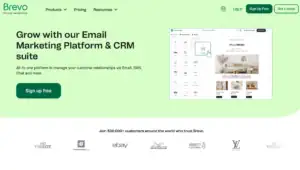
Go to Brevo’s website and click the sign up button. You’ll be asked for your name, your business email, and a password. No credit card is needed to start, which is one of the things I liked from day one.
After you sign up, check your inbox. Brevo sends a confirmation link, and you need to click it before you can do anything else in your account. Once that’s done, you’ll land on your dashboard for the first time.
Brevo will walk you through a short checklist when you first log in, asking a few basic questions about your business. It’s quick, and it helps the dashboard feel a little more set up for you right away. I’d say just answer honestly and move through it, it takes two minutes.
Step 2: Verify Your Sender and Set Up Your Domain
This step feels small, but skipping it is one of the biggest mistakes a new user can make.
Before you can send any campaign, Brevo needs you to verify the email address you’ll be sending from. Go to your sender settings, add your email, and click the confirmation link Brevo sends you. This step alone takes a minute.
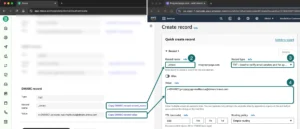
The bigger step, and the one I really want you to do, is setting up full domain authentication using SPF and DKIM records. These are just settings added to your website’s domain that prove to inbox providers, like Gmail and Outlook, that your emails are really coming from you and not being faked by someone else. Brevo shows you exactly what to add, step by step, inside your account, so you don’t need to understand the tech behind it, just copy and paste what it gives you into your domain settings.
Why this matters so much: skipping this step is one of the fastest ways to end up in spam folders, or worse, to get your account flagged early on. It takes about ten minutes to set up, and it makes a real difference to how many of your emails actually get seen.
Step 3: Import and Clean Your Contact List
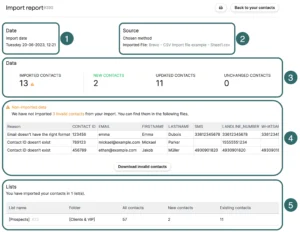
Head over to the Contacts tab and click Import Contacts. You can upload a CSV or Excel file with your subscriber names and email addresses, and Brevo will walk you through matching your file’s columns to the right fields, like name, email, and any custom details you want to track.
Here is the part I really want you to slow down for. Before you upload your whole list, take a moment to clean it up. Remove any email addresses that look fake, old, or clearly wrong, and only include people who actually agreed to hear from you. I know this feels like an annoying extra step when you just want to get going, but it’s the single biggest thing that protects your account from being flagged in your first few days.
If you have a large, older list you’re not fully sure about, don’t send to all of it at once. Start with a smaller, more trusted group first, and expand from there once you’ve built up a good sending history.
Step 4: Segment and Manage Your List
Once your contacts are in, don’t just leave them sitting in one big pile. This is where a lot of new users stop too early, and it’s a step that really pays off.
Lists are the basic groups you put contacts into, like “Newsletter subscribers” or “Past customers.” You can create as many as you need from the Contacts tab, and move people between them at any time.
Segments go a level deeper. Instead of a fixed group, a segment is a rule that pulls in whoever matches it, automatically. For example, you can build a segment for “people who opened my last three emails” or “contacts who haven’t clicked anything in sixty days.” Go to Contacts, then Segments, then set your rule using simple filters like opens, clicks, or a custom detail you saved about them, like their city or the plan they’re on.
I use segments mainly for two things: sending a re-engagement email to people who’ve gone quiet, and sending a slightly different message to my most active readers. It takes a few minutes to set up a segment, and it makes every email you send after that feel a lot more relevant to the person reading it.
One habit worth building early: tag or add a custom attribute to contacts as they come in, like where they signed up from, or what they’re interested in. It takes a few extra seconds per contact, but it means your segments get sharper the longer you use the tool.
Step 5: Create Opt-in Forms to Grow Your List
If you want your list to keep growing on its own, you need a way for new people to sign up, and this is where Brevo’s forms come in.
Go to Marketing, then Forms, then Create Sign-up Form. You’ll be asked to choose a type:
Full page or embedded form, which you can place on its own page or inside an existing page on your site.
Pop-up form, which appears on top of your page, either right away, after a short delay, or when someone is about to leave the page.
For either type, give your form a name for your own reference, then use the drag and drop builder to add fields like name and email, plus any extra details you want to collect. If you want people to be able to pick their own interests when they sign up, like choosing which type of emails they want, use the multi-list subscription block, and they’ll be sorted into the right list automatically the moment they submit the form.
I’d also turn on the GDPR fields option if your audience includes anyone in Europe. It adds a simple consent checkbox to your form, so people are clearly agreeing to hear from you, which protects you and keeps your list clean from the very start.
Once your form is built, Brevo gives you a simple embed code to paste into your website, or a direct link you can share anywhere, on social media, in your email signature, or in a blog post.
Step 6: Build a Landing Page
A landing page is a simple, standalone page you can send people to, separate from your main website, built around one single goal, like getting someone to sign up, download something, or check out an offer.
Go to Marketing, then Landing Pages, then Create a Landing Page. You can start from a ready-made template or build one from a blank page, using the same kind of drag and drop editor you’d use for an email, adding sections, text, images, and buttons, and adjusting colors and fonts to match your brand.
The part that matters most: add a sign-up form directly onto your landing page, using the same forms tool from the last step. This way, every landing page you build can collect new contacts straight into your Brevo list, without you doing anything extra.
Once it’s ready, preview it, publish it, and you’ll get a link you can host on a Brevo web address, or connect to your own domain if you have one. I use landing pages mainly for one thing: sending people there from an ad or a social post, since it keeps them focused on one single action instead of getting distracted by a full website menu.
Step 7: Build Your First Email Campaign
Now for the fun part. Go to Campaigns, then Create Campaign, then choose a Standard Email Campaign.
Here’s the order I follow every single time:
Name your campaign. This name is just for you, so you can find it later, it won’t be seen by anyone on your list.
Set your sender name and email, and pick your recipients. You can choose a full list or a smaller segment, like the ones you built in Step 4.
Write your subject line. Keep it short and honest about what’s inside. Brevo has a subject line tester built in, and an AI assistant too, if you’re stuck for ideas and want a starting point.
Choose your design. You can start from a template or build from a blank page using the drag and drop editor. Drag in blocks for text, images, and buttons from the panel on the left, and place them where you want.
Personalize it. Add the person’s first name or another detail you’ve stored about them, right inside the email, to make it feel less like a mass message.
Add one clear call to action. One button, one clear next step. Don’t try to get someone to do five things in one email.
Send yourself a test email first. Always. Every single time. Check how it looks on your phone and your laptop before it goes out to your real list.
Once everything looks right, you can send it immediately or schedule it for later.
Step 8: Set Up a Simple Automation
Once you’re comfortable sending a normal campaign, automation is the next real time saver, and it’s easier to set up than it looks.
Go to Automation and start a new workflow. A simple, useful first flow looks like this: send a welcome email the moment someone joins your list, wait two days, then check if they clicked a link inside it.
To build that wait and check step, drag a Time Delay block onto your flow and set it to two days. Then drag in a Conditional Split block, click Add Filter, choose Email, then Link Clicked in an Email, and pick the email you want to check. From there, you can send one follow up to people who clicked, and a different one to people who didn’t, all from the same automated flow, without you touching it again.
This is exactly the kind of flow I run myself for new subscribers, and it took me under an hour to set up the first time.
Step 9: Check the Performance of Your Campaigns
After your campaign goes out, don’t just move on to the next one. This step tells you if everything you did above is actually working.
Go to Marketing, then Statistics, to see your key numbers for each campaign:
Opens tell you if your subject line actually got people to click into the email.
Clicks tell you if what you wrote inside actually got people to act.
Bounces show you addresses that didn’t go through, which is worth checking often, since a high bounce rate can hurt your account’s sending health.
Unsubscribes tell you if something about the email pushed people away, worth a look if this number jumps suddenly.
For a deeper look, open a single campaign’s report and check the click heat map, which shows you exactly where inside the email people clicked. This is genuinely useful, since it tells you which part of your email actually got attention, not just whether the email as a whole worked.
If you want to check how your automation flow is doing, go directly into the workflow itself and click the Activity tab on the side. It shows you exactly how many people entered the flow, and where they are inside it right now, so you can see if people are getting stuck at a certain step or moving through smoothly.
I check these numbers after every single send. It’s the only real way to know if your subject lines are working, or if something in your email needs to change next time.
A Few Things I Learned the Hard Way
Don’t skip the domain setup, even though it feels optional. It genuinely changes how many of your emails land in the inbox instead of spam.
Go slow with your first few sends. Brevo watches your early results closely, and a messy list or a huge first send can get your account flagged before you’ve even had a chance to explain yourself.
Save your brand colors and logo once, in the brand kit. Every email you build after that will already match your brand, saving you a real amount of time.
Use segments before you assume everyone wants the same email. A quiet reader and your most active fan don’t need the exact same message.
Export your contact list every so often, just for yourself. It only takes a minute, and it means you’re never fully dependent on one platform holding your only copy.
FAQs
Do I need a credit card to start using Brevo? No. You can sign up and use the free plan without entering any payment details.
How long does it take to send my first campaign? If your account is already set up and your contacts are imported, building and sending a simple campaign takes about fifteen to twenty minutes.
Do I really need to set up SPF and DKIM records? Yes. It’s one of the most important steps for getting your emails into the inbox instead of spam, and Brevo gives you the exact details to copy into your domain settings, so it’s easier than it sounds.
What’s the difference between a list and a segment? A list is a fixed group you add people to yourself, like “Newsletter subscribers.” A segment is a rule, like “opened my last email,” that automatically pulls in anyone who matches it, so it updates on its own as people’s behavior changes.
Can I collect sign-ups without a full website? Yes. A Brevo landing page can act as your whole sign-up page, with its own link you can share on social media or in ads, no separate website needed.
Can I use automation on the free plan? Yes, automation is available on the free plan, but it only fully covers your first 2,000 contacts. If your list grows past that while you’re still on free, keep this limit in mind.
What’s the biggest beginner mistake to avoid? Uploading a large, old, or unconfirmed contact list and sending to all of it right away. Start small with a clean, trusted list, and grow your sending from there.
Can I edit an automation flow after it’s already running? Yes, you can go back into any workflow and adjust the steps, delays, or conditions at any time, even after contacts have already started moving through it.
Brevo vs Mailchimp My Personal Experience (And Why I Switched)
Brevo alternatives
